Tuesday, November 23, 2010

Mosaic Image Finder for ArcMap

Mosaic Image Finder for ArcMap

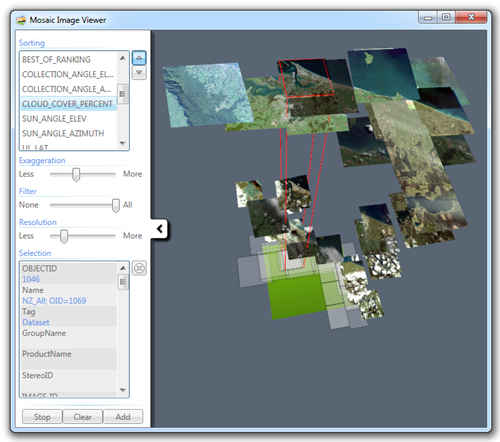
The Mosaic Image Finder is a new add-in for ArcMap to explore imagery within a mosaic.  The add-in supports mosaics stored locally in a geodatabase (or SDE connection) and mosaics published to ArcGIS Server as image services.

Mosaic Image Finder for ArcMap  Mosaic Image Finder for ArcMap

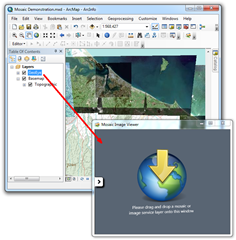
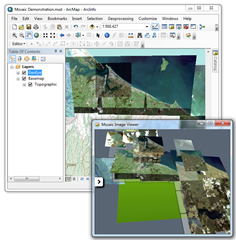
When a mosaic layer is dropped on to the Mosaic Image Finder window, thumbnails of mosaic images that overlap the current map extent are displayed in the three dimensional viewer as shown above. The images can be sorted vertically based on any numeric field.

The aim of this add-in was to provide an intuitive user interface for sorting and searching imagery in a mosaic. This add-in is particularly useful when mosaics contain good attribution and images are plentiful at an area of interest. When an image is selected, as indicated above with a red outline, it can be added to ArcMap as a new layer.

The add-in (with source code) can be downloaded from the ArcGIS Resource Center here. The download page contains installation instructions.

The Mosaic Image Finder window is created using WPF 3D (.NET). One of the difficulties when developing this application was creating a threading model for background image requests. If images were downloaded in the UI thread then ArcMap would totally lock-up. Even though background threads can use ArcObjects, it is not recommended to parse ArcObject references between threads, doing so will cause cross-thread issues such as a severe performance hit.  When possible I created proxy classes to assist with the exchange of simple data types like IEnvelope. However to parse a Layer I was forced to persist the layer to file and have it opened in the background thread, not the best but unavoidable.

Monday, November 22, 2010

3D Video Capture with hacked Xbox 360 Kinect

image

Last week Oliver Kreylos released this video on youtube showing a hacked Xbox 360 Kinect being used to generate 3D video. Amazing! It is no surprise that there has been almost 1.4 million views during the past week.

There are, of course, a tremendous number of possible applications of this technology. Many of which are impractical (like most augmented reality applications) but others may have promise. Interior mapping and video change detection are two fields that may benefit from variants of this technology.

In more recent videos Kreylos discusses options to achieve a true 360° 3D video. One option is to use two Kinect devices, with polarized filters, facing opposite each other. The filters would prevent one device from accidentally processing infrared beams from the opposing device. Software would then automagically stitch the two 3D video feeds together.

How to sort a list using a delegate

Sorting is a fundamental part software development. This post will review a technique of sorting generic lists with inline delegates.

First, let’s define an elementary class that we will collect and ultimately sort.

public class Person {
    public string Name { get; set; }
    public int Age { get; set; }
}

The following class, Family, will create a collection of persons and exposes two sorting methods. One method will sort the collection based on age and the other on name. These methods use inline delegates to specify the sorting logic, or more specifically, the logic to compare two individual people. Both methods use inline delegates but use slightly different syntax. The last method will print the names and ages of people in the collection. To print this information you must have your solution set to debug mode and “Debug” selected in the output window.

public class Family {
    public List<Person> _people = new List<Person>();
    public Family() {
        this._people = new List<Person>();
        this._people.Add(new Person() { Name = "Bob", Age = 43 });
        this._people.Add(new Person() { Name = "Jim", Age = 10 });
        this._people.Add(new Person() { Name = "Larry", Age = 15 });
        this._people.Add(new Person() { Name = "John", Age = 30 });
        this._people.Add(new Person() { Name = "Mary", Age = 8 });
    }
    public void SortFamilyByAge() {
        this._people.Sort(
            delegate(Person a, Person b) {
                return a.Age.CompareTo(b.Age);
            }
        );
    }
    public void SortFamilyByName() {
        this._people.Sort(
            (Person a, Person b) => {
                return a.Name.CompareTo(b.Name);
            }
        );
    }
    public void PrintFamily() {
        this._people.ForEach(
            p => {
                Debug.WriteLine(string.Format("{0} ({1})", p.Name, p.Age));
            }
        );
        Debug.WriteLine(Environment.NewLine);
    }
}

And finally, the following code will instantiate the family object and run the two sort methods, sort by age and sort by name.

Family family = new Family();
family.SortFamilyByAge();
family.PrintFamily();
family.SortFamilyByName();
family.PrintFamily();

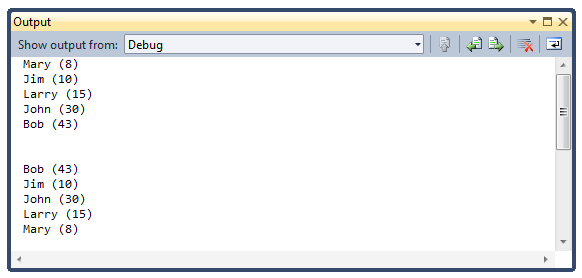
The code will produce the following output.

How to sort a list using a delegate

Friday, November 19, 2010

How to export a map to PDF (client-side)

 How to export a map to PDF (client-side)

This post will describe a technique for exporting a map created with the ArcGIS API for Silverlight to a PDF document completely client-side (no server-side computing).

You will need:

  1. Microsoft Visual Studio 2010 (link)
  2. Microsoft Silverlight 4 Tools for Visual Studio 2010 (link)
  3. ESRI ArcGIS API for Silverlight (link)
  4. silverPDF from codeplex (link)

How to build a map that can be saved to PDF:

Step 1 – In VS2010, create a new Silverlight Application called “SilverlightApplication1”, accept all the default options.

Step 2 – Add a reference to the ESRI’s ArcGIS API for Silverlight and silverPDF from codeplex.

Step 3 – Add the following to MainPage.xaml

<UserControl x:Class="SilverlightApplication1.MainPage"
   xmlns="http://schemas.microsoft.com/winfx/2006/xaml/presentation"
   xmlns:x="http://schemas.microsoft.com/winfx/2006/xaml"
   xmlns:d="http://schemas.microsoft.com/expression/blend/2008"
   xmlns:mc="http://schemas.openxmlformats.org/markup-compatibility/2006"
    xmlns:esri="http://schemas.esri.com/arcgis/client/2009"
   mc:Ignorable="d"
   d:DesignHeight="300" d:DesignWidth="400">
    <Grid x:Name="LayoutRoot" Background="White">
        <esri:Map x:Name="Map">
            <esri:ArcGISTiledMapServiceLayer
Url="http://services.arcgisonline.com/ArcGIS/rest/services/World_Imagery/MapServer" />
        </esri:Map>
        <Button x:Name=
"ButtonPdf"
HorizontalAlignment=
"Left"
VerticalAlignment=
"Bottom"
Margin=
"10,0,0,10"
IsEnabled="False"
Content="Create PDF"/
>
    </Grid>
</UserControl>

Step 4 – Add the following to MainPage.xaml.cs (code behind)

using System;
using System.Net;
using System.Windows;
using System.Windows.Controls;
using System.Windows.Resources;
using ESRI.ArcGIS.Client;
using ESRI.ArcGIS.Client.Geometry;
using PdfSharp.Drawing;
using PdfSharp.Pdf;

namespace SilverlightApplication1 {
    public partial class MainPage : UserControl {
        public MainPage() {
            InitializeComponent();

            // Listen to "Create PDF" button click
            this.ButtonPdf.Click += new RoutedEventHandler(this.Button_Click);

            // Enable "Create PDF" button only after the Imagery layer has loaded
            this.Map.Layers[0].Initialized += (s, e) => {
                this.ButtonPdf.IsEnabled = true;

                // Also, zoom to an adjusted full extent that fills the map canvas
                this.Map.ZoomTo(this.Map.Layers[0].FullExtent(this.Map));
            };
        }
        private void Button_Click(object sender, RoutedEventArgs e) {
            // Create a Save As dialog
            SaveFileDialog dialog = new SaveFileDialog();
            dialog.Filter = "PDF|*.pdf";

            // Show dialog. Exit if use closes dialog.
            if (!dialog.ShowDialog().Value) { return; }

            // Get the current tiled layer
            ArcGISTiledMapServiceLayer tiled = this.Map.Layers[0]
as ArcGISTiledMapServiceLayer;

            // Create a new dynamic layer from the same map service
            ArcGISDynamicMapServiceLayer dynamic = new ArcGISDynamicMapServiceLayer() {
                Url = tiled.Url,
                ImageFormat = ArcGISDynamicMapServiceLayer.RestImageFormat.JPG
            };

            // When the dynamic layer has initialized create the in-memory PDF document
            dynamic.Initialized += (a, b) => {
                dynamic.GetUrl(
                    this.Map.Extent,
                    (int)this.Map.ActualWidth,
                    (int)this.Map.ActualHeight,
                    delegate(string url, int width, int height, Envelope extent) {

                        // Download a new image of identical to what is currently
// displayed in the map

                        WebClient webClient = new WebClient();
                        webClient.OpenReadCompleted += (c, f) => {

                            // Use the dispatcher to force execution in the UI thread
                            Dispatcher.BeginInvoke(delegate() {
                                // Create the PDF document.
// Set document information properties.

                                PdfDocument document = new PdfDocument();
                                document.Info.Title = "World Imagery";

                                // Create a new page with the same dimensions as
// the browser map

                                PdfPage page = new PdfPage(document) {
                                    Height = new XUnit(this.Map.ActualHeight,
XGraphicsUnit.Presentation),
                                    Width = new XUnit(this.Map.ActualWidth,
XGraphicsUnit.Presentation)
                                };
                                document.Pages.Add(page);

                                // Create a graphics object for writing to the page
                                XGraphics graphics = XGraphics.FromPdfPage(page);

                                // Add the map image to the page
                                XImage map = XImage.FromStream(f.Result);
                                graphics.DrawImage(map, 0d, 0d);

                                // Save the PDF document to the user specified filename
                                document.Save(dialog.OpenFile());

                                // Inform the user that the PDF creation is complete
                                MessageBox.Show("PDF Creation Complete");
                            });
                        };
                        webClient.OpenReadAsync(new Uri(url));
                    }
                );
            };
            dynamic.Initialize();
        }
    }
    /// <summary>
    /// Extends the Esri Layer class with an alternative FullExtent property.
    /// Returns an adjusted extent conceptually similar to Image.Stretch==UniformToFill
    /// </summary>
    public static class LayerExtension {
        public static Envelope FullExtent(this Layer layer, FrameworkElement parent) {
            Envelope extent = layer.FullExtent;
            double ratioMap = parent.ActualHeight / parent.ActualWidth;
            double ratioLay = extent.Height / extent.Width;
            if (ratioMap < ratioLay) {
                return new Envelope() {
                    XMin = extent.XMin,
                    YMin = extent.GetCenter().Y - 0.5d * ratioMap * extent.Width,
                    XMax = extent.XMax,
                    YMax = extent.GetCenter().Y + 0.5d * ratioMap * extent.Width
                };
            }
            return new Envelope() {
                XMin = extent.GetCenter().X - 0.5d * extent.Height / ratioMap,
                YMin = extent.YMin,
                XMax = extent.GetCenter().X + 0.5d * extent.Height / ratioMap,
                YMax = extent.YMax
            };
        }
    }
}

The web application is now ready to run in debug.  When the application loads, use your mouse (and mousewheel) to navigate to your favorite location on the planet.  Click the “Create PDF” button to commence the PDF export.  You will first be prompted for the output location of the PDF document and then again when the export is complete.