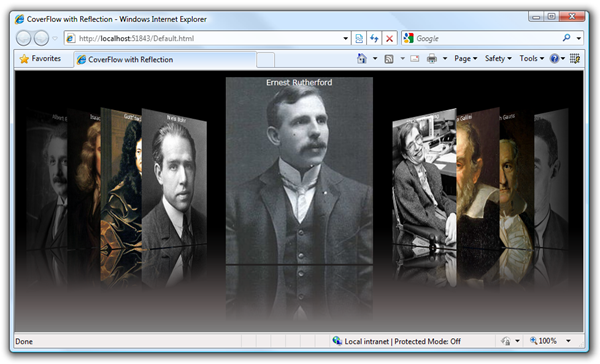
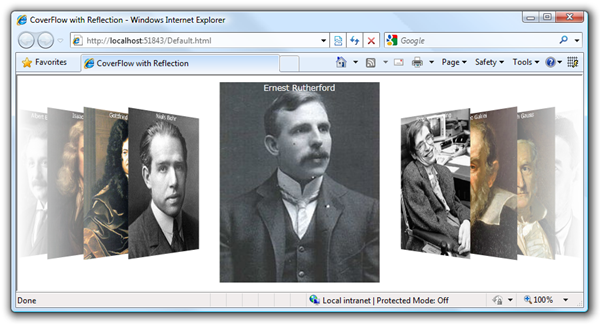
This post describes how to create an attractive and compelling cover flow control using Silverlight as illustrated below.
The basis of this sample is the excellent work done by Darick C with his Silverlight Cover Flow project published on CodePlex. To begin, download Darick’s Cover Flow contribution. Create a new Silverlight application called “CoverFlowWithReflection” in Microsoft Visual Studio 2008, and add reference to either the Coverflow project or binary.
Below is the XAML for MainPage.xaml. Each cover flow item is defined with an image and a textbox.
<UserControl
    x:Class="CoverFlowWithReflection.MainPage"
    xmlns="http://schemas.microsoft.com/winfx/2006/xaml/presentation"
    xmlns:x="http://schemas.microsoft.com/winfx/2006/xaml"
    xmlns:d="http://schemas.microsoft.com/expression/blend/2008"
    xmlns:mc="http://schemas.openxmlformats.org/markup-compatibility/2006"
    mc:Ignorable="d"
    d:DesignWidth="640"
    d:DesignHeight="480"
    xmlns:c="clr-namespace:ControlLibrary;assembly=ControlLibrary"
    >
    <Grid>
        <c:CoverFlowControl x:Name="CoverFlow" Margin="0,10,0,0">
            <c:CoverFlowControl.ItemTemplate>
                <DataTemplate>
                    <Grid>
                        <Image Source="{Binding Path=Picture, Mode=OneWay}"
                               Height="300"
                               Stretch="UniformToFill"
                               />
                        <TextBlock Text="{Binding Path=Name, Mode=OneWay}"
                                   Foreground="White"
                                   HorizontalAlignment="Center"
                                   FontSize="12"
                                   />
                    </Grid>
                </DataTemplate>
            </c:CoverFlowControl.ItemTemplate>
        </c:CoverFlowControl>
    </Grid>
</UserControl>
The following snippet is for the MainPage.xaml code-behind (or MainPage.xaml.cs). The code defines a new generic collection and assigns it to the coverflow control. Please excuse the crazy formatting, this is required to squeeze the text into the blog.
using System.Collections.ObjectModel;
using System.Windows.Controls;

namespace CoverFlowWithReflection {
    public partial class MainPage : UserControl {
        private const string PREFIX =
             "http://upload.wikimedia.org/wikipedia/commons/thumb/";
        private ObservableCollection<Thumbnail> _thumbnails =
            new ObservableCollection<Thumbnail>();
        //
        // CONSTRUCTOR
        //
        public MainPage() {
            InitializeComponent();

            // Populate thumbnail collection
            this._thumbnails.Add(
                new Thumbnail {
                    Name = "Albert Einstein",
                    Picture = PREFIX +
                        "7/78/Einstein1921_by_F_Schmutzer_4.jpg" +
                        "/225px-Einstein1921_by_F_Schmutzer_4.jpg"
                }
            );
            this._thumbnails.Add(
                new Thumbnail {
                    Name = "Isaac Newton",
                    Picture = PREFIX +
                        "3/39/GodfreyKneller-IsaacNewton-1689.jpg" +
                        "/225px-GodfreyKneller-IsaacNewton-1689.jpg"
                }
            );
            this._thumbnails.Add(
                new Thumbnail {
                    Name = "Gottfried Leibniz",
                    Picture = PREFIX +
                        "6/6a/Gottfried_Wilhelm_von_Leibniz.jpg" +
                        "/200px-Gottfried_Wilhelm_von_Leibniz.jpg"
                }
            );
            this._thumbnails.Add(
                new Thumbnail {
                    Name = "Niels Bohr",
                    Picture = PREFIX +
                        "6/6d/Niels_Bohr.jpg" +
                        "/180px-Niels_Bohr.jpg"
                }
            );
            this._thumbnails.Add(
                new Thumbnail {
                    Name = "Ernest Rutherford",
                    Picture = PREFIX +
                        "5/57/Ernest_Rutherford2.jpg" +
                        "/200px-Ernest_Rutherford2.jpg"
                }
            );
            this._thumbnails.Add(
                new Thumbnail {
                    Name = "Stephen Hawking",
                    Picture = PREFIX +
                        "e/eb/Stephen_Hawking.StarChild.jpg" +
                        "/200px-Stephen_Hawking.StarChild.jpg"
                }
            );
            this._thumbnails.Add(
                new Thumbnail {
                    Name = "Galileo Galilei",
                    Picture = PREFIX +
                        "c/cc/Galileo.arp.300pix.jpg" +
                        "/225px-Galileo.arp.300pix.jpg"
                }
            );
            this._thumbnails.Add(
                new Thumbnail {
                    Name = "Carl Friedrich Gauss",
                    Picture = PREFIX +
                        "9/9b/Carl_Friedrich_Gauss.jpg" +
                        "/225px-Carl_Friedrich_Gauss.jpg"
                }
            );
            this._thumbnails.Add(
                new Thumbnail {
                    Name = "J. Robert Oppenheimer",
                    Picture = PREFIX +
                        "0/03/JROppenheimer-LosAlamos.jpg" +
                        "/200px-JROppenheimer-LosAlamos.jpg"
                }
            );

            // Assign collection to CoverFlow control
            this.CoverFlow.ItemsSource = _thumbnails;
        }
    }
    public class Thumbnail {
        public string Name { get; set; }
        public string Picture { get; set; }
    }
}
The result of this code is a functional coverflow control as shown below.
The control is excellent for presenting a catalog of information and also providing an organic look and feel. The following two snippet will demonstrate how to add depth to this control. First, define a transitional background.
<Grid>
    <Grid.Background>
        <LinearGradientBrush StartPoint="0,0" EndPoint="0,1">
            <GradientStop Color="#000000" Offset="0.0"/>
            <GradientStop Color="#000000" Offset="0.6"/>
            <GradientStop Color="#131212" Offset="0.7"/>
            <GradientStop Color="#3A3535" Offset="0.8"/>
            <GradientStop Color="#625A5A" Offset="0.9"/>
            <GradientStop Color="#808080" Offset="1.0"/>
        </LinearGradientBrush>
    </Grid.Background>
    <c:CoverFlowControl x:Name="CoverFlow" Margin="0,10,0,0">
        <!-- omitted for clarity  -->
    </c:CoverFlowControl>
</Grid>
This gives the illusion that the coverflow items (images in this case) are residing on a surface with a little perspective.
And lastly, to the complete the visual effect, lets add a reflection. This is achieved by adding a second image to the coverflow item data template. A RenderTransfrom and OpacityMask are used to flip and fade the image respectively.
<c:CoverFlowControl x:Name="CoverFlow" Margin="0,10,0,0">
    <c:CoverFlowControl.ItemTemplate>
        <DataTemplate>
            <Grid>
                <Image Source="{Binding Path=Picture, Mode=OneWay}"
                       Height="300"
                       Stretch="UniformToFill"
                       />
                <TextBlock Text="{Binding Path=Name, Mode=OneWay}"
                           Foreground="White"
                           HorizontalAlignment="Center"
                           FontSize="12"
                           />
                <Image Source="{Binding Path=Picture, Mode=OneWay}"
                       Height="300"
                       Stretch="UniformToFill"
                       RenderTransformOrigin="0.5,1.0">
                    <Image.RenderTransform>
                        <TransformGroup>
                            <ScaleTransform ScaleY="-1"/>
                            <TranslateTransform Y="3"/>
                        </TransformGroup>
                    </Image.RenderTransform>
                    <Image.OpacityMask>
                        <LinearGradientBrush StartPoint="0.5,0"
                                             EndPoint="0.5,1">
                            <GradientStop Color="#00000000" Offset="0.0"/>
                            <GradientStop Color="#00000000" Offset="0.7"/>
                            <GradientStop Color="#FFFFFFFF" Offset="1.0"/>
                        </LinearGradientBrush>
                    </Image.OpacityMask>
                </Image>
            </Grid>
        </DataTemplate>
    </c:CoverFlowControl.ItemTemplate>
</c:CoverFlowControl>
The result is an attractive clowflow with reflection.
There are two alternatives to this technique that you may want to consider. The first is to use a pixel shader in Silverlight 3, Steve from Cellbi describes how to create a reflection pixel shader in this post. The second is to make use of Silverlight 3’s WriteableBitmap class to generate a reflection. Jeff Prosise from Wintellect describes the technique in this post.
The source code for this sample application is here:
http://cid-dd16c3f34f4d913e.skydrive.live.com/self.aspx/Kiwigis/CoverFlowWithReflection.zip


